Etherchannel, also known as Link Aggregation, is a technology that allows grouping several physical interfaces that connect a pair of devices; when the etherchannel is established, the devices see it as a single logical interface, increasing the bandwidth considerably.
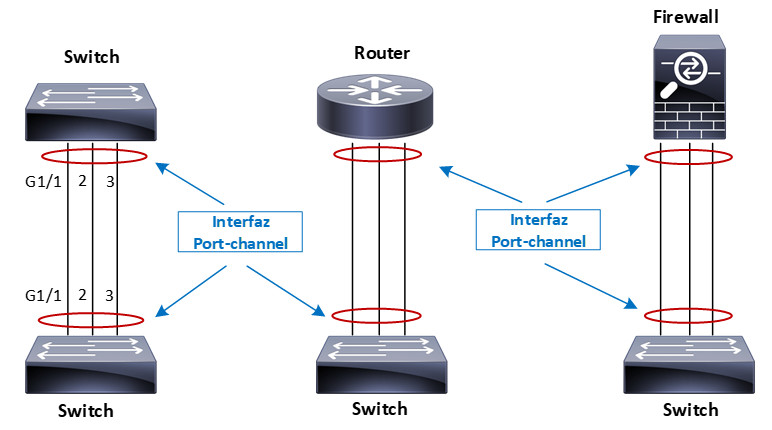
Up to eight physical interfaces can be grouped into a single logical interface; this new logical interface is called Port-Channel. EtherChannel ports can be configured at Layer 2 or Layer 3.
EtherChannel provides high-speed, fault-tolerant links between switches, routers, firewalls, and servers. If a link fails, EtherChannel redirects traffic from the failed link to the remaining links in the port-channel without administrative intervention and is transparent to the end-user.
The control plan protocols consider the logical port-channel interface and not the individual interfaces that comprise them, e.g., Spanning-Tree.
For etherchannel to work, both devices must understand and use the technology to function correctly.
Generally, all ports grouped must first belong to the same VLAN. If used as a trunk, the trunked ports must be in trunking mode, have the same native VLAN, and pass the same VLAN set. Each port must have the same speed and duplex configuration before grouping. The bundled ports must also have identical spanning-tree configurations.
The port-channels to be used at layer 3 must be configured with the no switchport command.
Port-channel load balancing
The distribution of frames between the physical interfaces that make up the port-channel is based on a hashing function. This hash depends on the method used for load balancing. The result obtained from the hash identifies which physical port will be used to send the frame.
The hashing operation can be performed on MAC or IP addresses and can be based only on the source address, destination address, or both (some methods use the port number). The default load-balancing methods depend on the model and software version of the switch; they can be layer 2, 3, or 4 and apply globally to all port-channels. Let’s look at some of the available etherchannel balancing methods:
- src-ip : Source IP address
- dst-ip : Destination IP address
- src-dst-ip : Source and destination IP address
- src-mac : Source MAC address
- dst-mac : Destination MAC address
- src-dst-mac : Source and destination MAC address
- src-port : Source port number
- dst-port : Destination port number
- src-dst-port : Destination source port number
The configuration of the balancing method is with the following command:
Switch# port-channel load-balance <method>

! Example: Each platform provides some extra methods

Switch# port-channel load-balance ?
  dst-ip                      Dst IP Addr
  dst-mac                     Dst Mac Addr
  dst-mixed-ip-port           Dst IP Addr and TCP/UDP Port
  dst-port                    Dst TCP/UDP Port
  mpls                        Load Balancing for MPLS packets
  src-dst-ip                  Src XOR Dst IP Addr
  src-dst-mac                 Src XOR Dst Mac Addr
  src-dst-mixed-ip-port       Src XOR Dst IP Addr and TCP/UDP Port
  src-dst-port                Src XOR Dst TCP/UDP Port
  src-ip                      Src IP Addr
  src-mac                     Src Mac Addr
  src-mixed-ip-port           Src IP Addr and TCP/UDP Port
  src-port                    Src TCP/UDP Port
  vlan-dst-ip                 Vlan, Dst IP Addr
  vlan-dst-mixed-ip-port      Vlan, Dst IP Addr and TCP/UDP Port
  vlan-src-dst-ip             Vlan, Src XOR Dst IP Addr
  vlan-src-dst-mixed-ip-port  Vlan, Src XOR Dst IP Addr and TCP/UDP Port
  vlan-src-ip                 Vlan, Src IP Addr
  vlan-src-mixed-ip-port      Vlan, Src IP Addr and TCP/UDP Port

Switch(config)#
Command to see the method of balancing that a switch has:
Switch# show etherchannel load-balance
EtherChannel Load-Balancing Configuration:
        src-dst-ip

EtherChannel Load-Balancing Addresses Used Per-Protocol:
Non-IP: Source XOR Destination MAC address
  IPv4: Source XOR Destination IP address
  IPv6: Source XOR Destination IP address

Switch#
To verify how effectively a configured load balancing method is running, you can use the show etherchannel port-channel command. Each link in the channel is displayed, along with a hexadecimal “Load” value. Although this information is not intuitive, you can use the hexadecimal values to get an idea of the traffic loads of each link relative to each other.
Switch# show etherchannel port-channel
                Channel-group listing:
                -----------------------

Group: 10
----------
                Port-channels in the group:
                ----------------------

Port-channel: Po10    (Primary Aggregator)

------------

Age of the Port-channel   = 1344d:00h:15m:03s
Logical slot/port   = 14/2          Number of ports = 2
HotStandBy port = null
Port state          = Port-channel Ag-Inuse
Protocol            =   LACP
Port security       = Disabled
Fast-switchover     = disabled
Fast-switchover Dampening = disabled
Load share deferral = disabled
Is fex host PO    = FALSE

Ports in the Port-channel:

Index   Load      Port          EC state       No of bits
------+------+------------+------------------+-----------
 0      8E            Te5/1             Active   4
 1      71            Te5/2             Active   4

Time since last port bundled:    287d:08h:41m:08s    Te5/2
Time since last port Un-bundled: 287d:10h:48m:10s    Te5/2
When a port-channel goes to the errdisable state, it is necessary to power down and power up the port-channel interface and the individual physical interfaces.
The following post will discuss the existing protocols for establishing etherchannel links.
For more information: